Agentic Development Setup - Architecture
- Mar 17
- 7 min read
How to structure your project before writing a single prompt
Most AI setups are lazy. No context. No rules. No structure. Just prompts fired into the void.
I spent some time to build the architecture that changes that.
The quality of your setup determines the quality of everything that follows.
Get the foundation right and the agent becomes a specialist — one that knows your codebase, your design system, and your compliance rules without being told every session.
Seven layers. Each one earning its place.

The mental model first
Before the folder structure, understand why it exists.
Rules tell the agent how to always behave. Skills give it project-specific knowledge on demand. Agents define who does the work. Hooks enforce things it can never bypass. MCP connects it to your live tools.
Together, these turn a generic AI into a specialist that knows your project inside out. Now let's build it.
A note on this architecture
Everything you see in this article — the folder names, skills, agents, hooks, and file structure — is built around a real Hospital Billing SaaS project I worked on using Antigravity and Claude Code.
The domain is specific. The architecture is universal.
billing/, insurance/, compliance.md, @billing-specialist — these are hospital billing concepts. Your project will have different domains entirely. A fintech product might have transactions/, kyc/, fraud/ as skills. A design tool might have components/, tokens/, accessibility/.
The pattern stays exactly the same. Only the names change.
Use this as a blueprint — not a template to copy blindly.

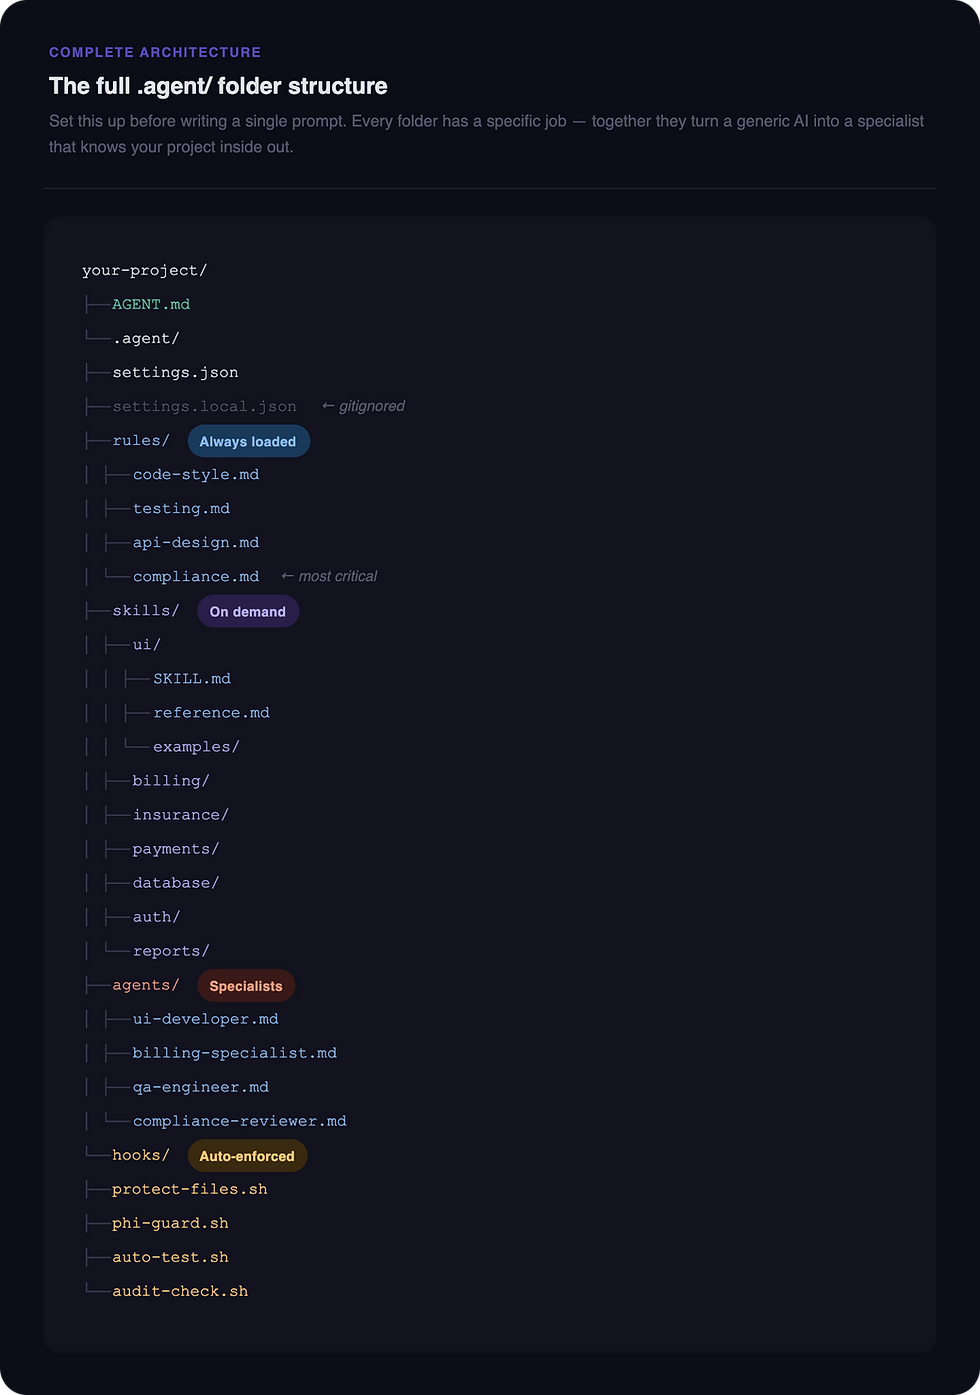
Two files live at the root of your project before anything else.
AGENT.md — the project brain
This is the first thing the agent reads. Every single session. It's your project's briefing document — the equivalent of what you'd hand a new team member on day one.
What goes inside:
What the project is and who it's for
Tech stack — framework, database, payment provider, auth
User roles — who can do what
Project structure — where files live
Current focus — what you're building right now
Critical requirements — anything non-negotiable
Without this, you're re-explaining your project every time. With it, the agent walks in already knowing the context.
.gitignore
Must include settings.local.json. This keeps your personal API keys and secrets off git and out of your team's hands. More on why this matters in Step 2.
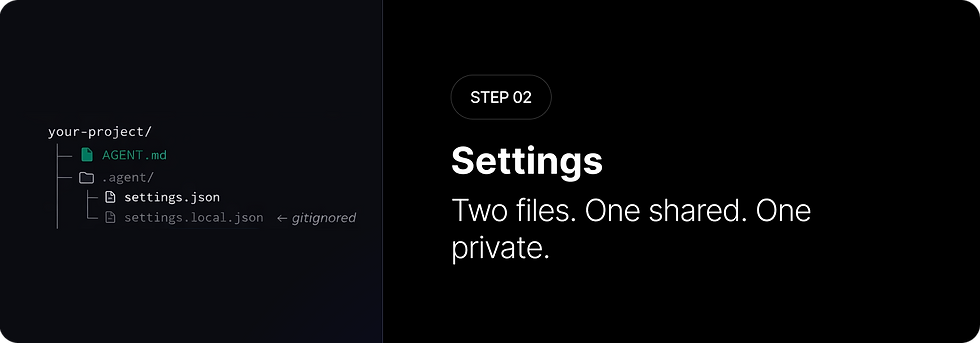
settings.json — team-wide config
Committed to git. Everyone on the team gets this. It defines:
Which model to use
Which tools are enabled (file editing, terminal, browser)
What the agent is allowed to do
File size limits and permissions
This is your team's policy file for the agent. Consistent behaviour across every machine.
settings.local.json — personal overrides (gitignored)
Your machine only. Never committed. This is where you store:
Personal API keys
Database passwords
Local environment overrides
Anything secret
It merges on top of settings.json and your values win. The team gets a safe shared config. You keep your secrets private. Both work together without either getting in the other's way.

Four markdown files. Loaded automatically on every task, no exceptions.
Rules are not suggestions. They are standing orders the agent follows before doing anything.
code-style.md
How code should look in your project. Language, naming conventions, formatting, import order, what's forbidden. Without this, the agent writes valid code that doesn't match your conventions.
testing.md
How to test in your project. Which framework, minimum coverage requirements, what to always mock, how to name tests. Without this, the agent might write Jest tests in a Vitest project.
api-design.md
How APIs are structured. Response envelope shape, status codes, validation approach, naming conventions, pagination. Without this, every endpoint returns data in a different format.
compliance.md
Your non-negotiable requirements. For a healthcare product this is HIPAA — PHI handling, audit logging, encryption, access control. For any product it's your security requirements and the things that can never be skipped.
This is the most important rule file you'll write.

This is where agentic development gets interesting.
Unlike rules which load on every task, skills load on demand — only when the agent determines they're relevant to what you've asked it to do.
How skill loading works
Each skill is a folder with one required file: SKILL.md
At the very top of every SKILL.md is YAML frontmatter:
---
name: billing

description: Handles hospital invoice generation, CPT procedure codes,ICD-10 diagnosis codes, and billing cycles. Use when
creating or editing anything related to patient invoices or medical billing.

---
The agent reads the description field from every skill, matches it against your task, and loads only the relevant ones. The description field is everything. Write it well — be specific about what the skill covers and when to use it.
reference.md — deep detail, API reference, edge cases. Add when SKILL.md gets too long.
examples/ — Figma links, screenshots, real code patterns. Especially useful for UI skills.
scripts/ — helper shell scripts. Useful for database migrations, test setup, deployment tasks.
None of these are mandatory. Add them when you feel the need, not upfront.
Skills for this project
skills/
├── ui/         → components, Figma design system, tokens
├── billing/    → invoices, CPT codes, ICD-10, billing cycles
├── insurance/  → claims, ERA processing, denial handling
├── payments/   → Stripe, co-pay collection, refunds, plans
├── database/   → Prisma, schema conventions, migrations
├── auth/       → roles, sessions, access control
└── reports/    → revenue reports, claim status, analytics
One skill per domain. Focused and specific. The agent picks up exactly what it needs — nothing extra, nothing missing.

An agent is a specialist with a defined role, a set of responsibilities, and a list of skills it loads automatically.
You use them with a simple @ mention: @billing-specialist create an invoice for patient PAT-001
Each agent .md file defines:
Role — who they are, written in second person ("You are a senior medical billing specialist...")
Responsibilities — what they own in the project
Skills to load — which skill files they always pull in
Behaviour rules — how they should act, what they always do, what they never do
The agents for this project
@ui-developer — builds all React components, reads Figma before every task, never guesses at design tokens
@billing-specialist — generates invoices, applies CPT and ICD-10 codes, validates against lookup tables, always logs PHI access
@qa-engineer — writes unit, integration and e2e tests, covers happy path and edge cases, never uses real patient data in tests
@compliance-reviewer — audits every function touching patient data, checks for PHI in logs and error messages, flags before shipping
Agent communication in parallel
Agents don't talk to each other in real time (Antigravity). They communicate through shared files.
Three files make this work:
MEMORY.md — the shared brain. What has been built, decisions made, current state.
handoffs.md — message passing between agents. "I built X, here's what QA needs to test."
in-progress.md — prevents file conflicts. Shows which agent is editing which files right now.
Set this up before you run multiple agents in parallel. Without it, agents overwrite each other's work.

Hooks are automatic scripts that fire when specific events happen — before or after a file edit, before a terminal command runs, after a task completes.
The critical distinction between rules and hooks:
Rules = guidelines the agent should follow Hooks = hard gates it cannot get around For a healthcare product, hooks are your last line of defence. Even if the agent misses something in the rules, the hook catches it.
Four hooks for this project
protect-files.sh Fires before any file edit. Blocks modifications to critical files — migration history, production environment files, the compliance rules themselves.
phi-guard.sh Fires before every file write. Scans for patterns that indicate PHI in console logs or error messages. If it finds a patient name, date of birth, SSN, or diagnosis code being logged — it blocks the write completely.
auto-test.sh Fires after any file in the billing logic is edited. Automatically runs the test suite. If tests fail, the agent cannot continue until they pass.
audit-check.sh Fires after any file touching patient data is edited. Verifies that an audit_log INSERT exists in the function. If not, it blocks and flags the missing compliance requirement.

MCP stands for Model Context Protocol. It's a live bridge between the agent and your external tools.
Before MCP, you copy-pasted data between your tools and the agent. After MCP, the agent works directly inside your tools.
The agent reads and writes your live database. It can:
List all tables and inspect schema
Create tables and relationships
Set up Row Level Security policies
Run queries and return real results
Seed test data
Target the right project using your project_ref ID from the Supabase dashboard. Put this in settings.json so every agent task automatically hits the right database.
The agent reads your design system live. It can:
Extract exact color tokens with hex values
Read component names and variants
Pull spacing, typography, and border radius values
Read specific frames and layouts
The result is pixel-accurate code — not approximations. The component is named exactly as it is in Figma. The color is the exact hex value from your design system. The spacing matches to the pixel.
Update your skills/ui/SKILL.md to reference your Figma file key so the agent always knows which file to open.
Claude Code → Figma
This one is newer and genuinely changes the design-to-code workflow.
You build UI in Claude Code or Antigravity. The agent captures the live UI from your browser. It lands as editable frames directly on your Figma canvas — properly structured, named, and ready for the designer to iterate.
The full roundtrip:
Design in Figma
→ Figma MCP reads exact tokens
→ Agent builds pixel-accurate code
→ Capture live UI back to Figma
→ Designer refines and iterates
→ Roundtrip continues
The handoff gap — the friction between design and code that every team experiences — essentially disappears.
One honest caveat
This is not a day-one checklist.
Nobody should create all seven layers, seven skills, four agents, and four hooks before writing a single line of code. That's premature architecture.
Build the architecture as you learn what you need. The structure above is what a mature project looks like — not what you build on day one.
Why this matters for designers specifically
Most people learning agentic development come from an engineering background. They understand the code side but struggle with the design thinking behind the structure.
As a designer with 14 years of experience, you bring something different. You understand systems, component architecture, design tokens, and what good UI actually looks like. The skills/ui/SKILL.md file you write will be far more precise than what a developer would write — because you know what actually matters in a design system.
The agent won't just follow your folder structure. It'll follow your design thinking.
That's the real advantage.
Still exploring 🐳
I'm a product and UX designer — not a developer. This entire setup came from one day of deep exploration and honest curiosity.
I'm still learning this space. If you have feedback, corrections, or suggestions, I'd genuinely love to hear them.
Comments